When Apple announced iCloud+ at WWDC 2021 developer conference, one key feature that caught the attention of a lot of internet users was “iCloud Private Relay”. But what exactly is iCloud Private Relay? Is it Apple’s new way of calling a VPN in iOS 15? That’s what we will be discussing in this article about Apple’s iCloud Private Relay, and learn if it is better than a VPN or not.
Apple’s iCloud Private Relay: Everything You Need to Know (2021)
What is iCloud Private Relay?
iCloud Private Relay is Apple’s latest privacy-friendly addition to enhance the privacy of users while browsing the web on Safari. It is part of the new iCloud+ subscription that’s available for paid iCloud customers. Behind the scenes, Private Relay uses a dual-hop architecture while you browse the internet. All the web traffic that leaves your device is encrypted and sent through two internet relays.
While the first relay assigns an anonymous IP address, the second relay decrypts the web addresses and takes users to the destination. This way, no single entity can identify the user and the sites they visit. For the second relay, Apple has partnered with third-party providers.
From a technical standpoint, you should know that Private Relay involves an Ingress Proxy and an Egress Proxy. Ingress Proxy accepts connections from the internet and makes sure other servers don’t access your IP address and encrypts your internet traffic. On the other hand, Egress Proxy relays back to the internet while also preventing Ingress Proxy from seeing the websites you visit.
While Apple doesn’t name its content partners, user reports suggest that the company has partnered with Cloudflare, Akamai, and Fastly for the Egress Proxy or exit node.
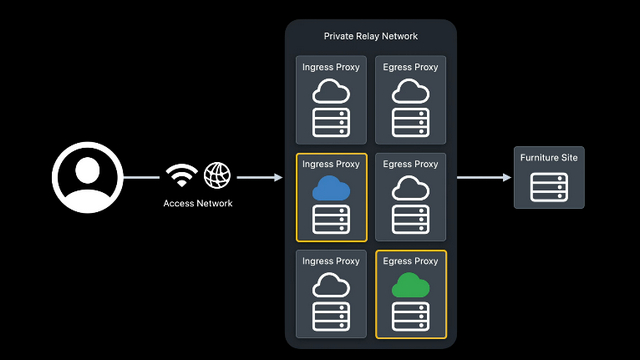
Image Courtesy: Apple
Think of it as a VPN, but Apple’s implementation of Private Relay isn’t exactly the same as what you would find on a VPN. Check the next section to learn more on how Private Relay differs from a traditional VPN service.
Apple Private Relay vs VPN: What’s the Difference?
For starters, Private Relay maps users to a different location in their region. This is unlike VPN, where users can choose the destination. To put that in perspective, you may not necessarily be able to access a website that’s banned in your country with Private Relay. That’s clearly not the case with a VPN where you can choose any supported location in the world to access geo-restricted content. So if you were planning to use Private Relay to watch the best Netflix shows that are not available in your country, you are out of luck.
And there’s the fact that you will have to stick to the Safari browser to use the benefits of Private Relay. Private Relay will not support other best browsers for privacy on iOS. So, what does Private Relay solve and why does it exist? Well, using a VPN requires users to trust the VPN provider. While using a trusted VPN service should solve this, there are numerous shady VPN providers out there that are often secretly logging your browsing activity. That’s where Apple serves as a trusted intermediary with Private Relay.
“We wanted to provide many of the benefits that people are seeking when in the past they’ve decided to use a VPN, but not force that difficult and conceivably perilous privacy trade-off in terms of trusting it a single intermediary,” said Apple’s Craig Federighi in an interview with Fast Company.
Is Private Relay Better than Traditional VPN Services?
Will Private Relay replace a paid VPN? No, you don’t get the ability to bypass geo-restrictions and browse with your desired location. Is it better than a free VPN in most cases? Yes, if all you want to do is browse the internet without being tracked and you happen to be a paid iCloud user who also uses the Safari browser, you could switch to Private Relay.
How to Enable iCloud Private Relay in iOS 15
1. Open the Settings app on your iPhone, tap on the Apple ID preview card present at the top, and choose iCloud.
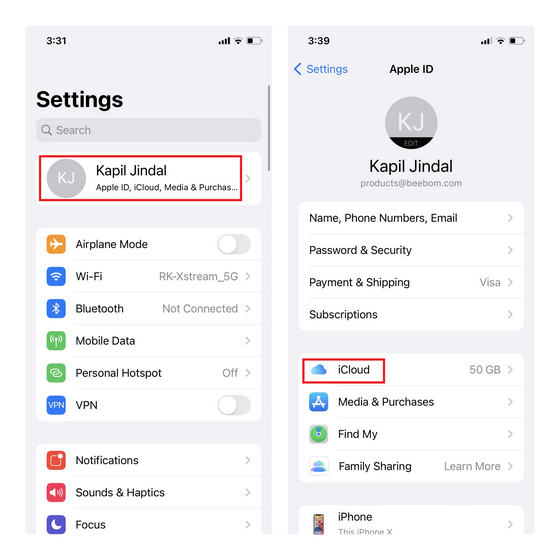
2. Under iCloud Settings, tap on Private Relay and enable the “Private Relay” toggle from the next page. You can now start using iCloud Private Relay with Safari browser. You could also install extensions in Safari on iOS 15 to elevate the experience.

How to Enable iCloud Private Relay in macOS 12
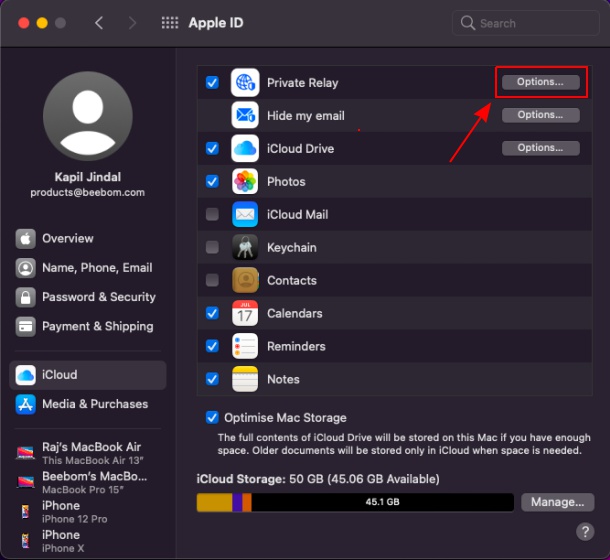
1. Open System Preferences of your Mac and click on “Apple ID” at the top-right corner.
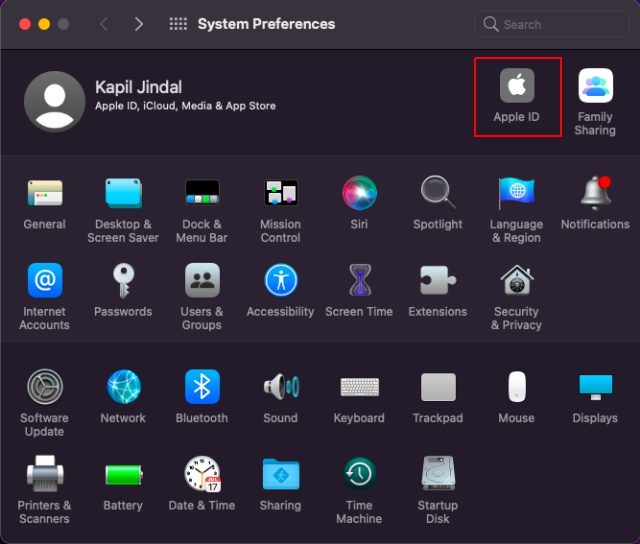
2. Under iCloud Settings, locate “Private Relay” and click on the “Options” button.
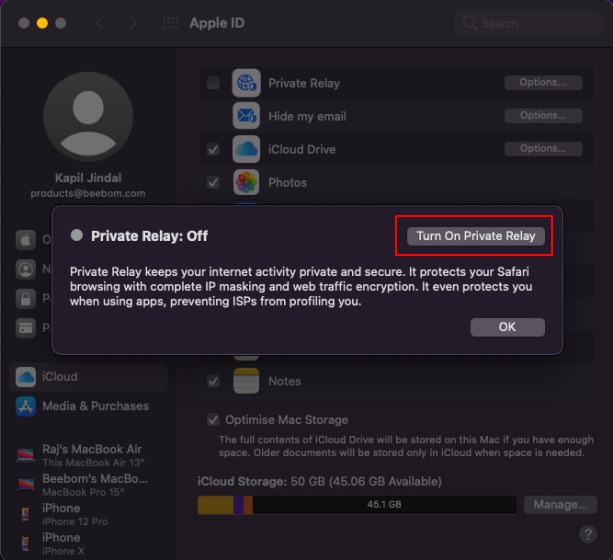
3. From the pop-up that appears now, click on the “Turn on Private Relay” button and hit OK. And that’s it. You can open Safari to browse the web using the service.
Note: At this point, I would like to point out that Privacy Relay is enabled by default when you get the iCloud+ subscription. So this process will come in handy if you disabled the feature in the past.
Alternatives to Apple’s iCloud Private Relay – Cloudflare WARP+
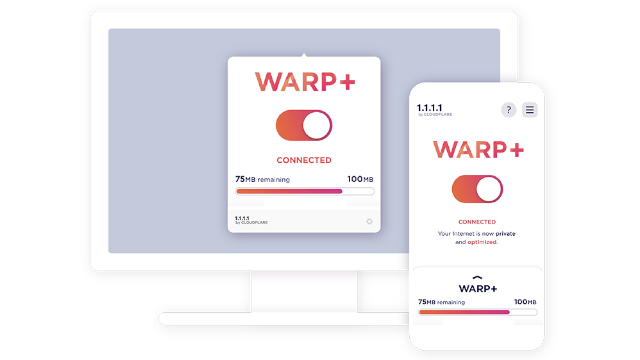
The closest equivalent to iCloud Private Relay would be Cloudflare WARP+. While the underlying architecture of Cloudflare WARP differs from how Apple has implemented iCloud Private Relay, you get similar features. I have been using Cloudflare Warp+ ever since it launched back in 2019, and the experience has been fairly reliable.
Although you shouldn’t expect the same speed as before, it doesn’t significantly slow down your internet speed and offers a fairly consistent browsing experience. You can download Cloudflare’s 1.1.1.1 app on Android (Free) and iOS (Free). Cloudflare also offers WARP+ for macOS and Windows users, so visit the website right here.
Try Apple’s iCloud Private Relay on Safari
So, that’s pretty much everything you should know before using iCloud Private Relay. As mentioned earlier, iCloud Private Relay is not a VPN killer, and paid VPN services are still superior in terms of features and flexibility. To learn more about other iCloud+ features, check out our in-depth explainer linked here. You can also explore other amazing iOS 15 features, including how to screen share in FaceTime on iOS 15, blur the background in FaceTime video calls, and more.